
A Guide to Tower Typeage & their Placement
Hi guys ^^ I've been meaning to write this for some time, but something always got in the way. I've been playing MazebertTD for some time now, and before it, YouTD (and other lesser TDs) for years. I would say I have a reasonable knowledge of tower defences and how they work. That said, let's get on to the guide. - jhoi [Edited: 26/07/14] ||| Definitions ||| First, a few definitions. Generally speaking, all towers in Mazebert TD falls into these two typages, though overlap can occur in rare circumstances. Carry: The term "carry" originated from Warcraft III's DotA map, wherein a hero "carries" their team to victory. Over time the term has come to be a noun and a verb, and encompasses many games. For instance, you can "carry" a game of Halo by being the most skilled player. In Tower Defences, the Carry is the tower that deals the most damage per second (DPS); in some TDs, there is no carry tower. However, in Mazebert TD, due to the replace system, leveling system, potions/oils and items, typically only three towers can be carry towers, with the other towers left as support. Support: The support type in games has been around for a long time; you could even argue that in old consoles, the Player Two character with limited impact is a "support" character. As you can imagine, the term support in a TD relates to the tower's ability to support the other towers, OR support the player. A support tower typically doesn't do much damage, but lends damage or other desirable stats to surrounding towers or to gameplay. For instance, a tower that increases the attack speed of nearby towers, but has a small damage output, is considered a support tower. Rarely, a support tower can also "carry" due to some factors. ||| List of Tower Typage ||| This list is subject to change as the game is updated and new maps are released, but I've given a quick description of each current tower and whether it is a carry or support tower; towers are ordered randomly as opposed to viability, as the two map choices allows other towers to be better carries depending on the map. The type of tower dictates where it should be placed on the map, and I'll get to placement later. Additionally, the tower type dictates the items and oils/potions it should consume; this will also be covered later. Carry Towers Shadow: Hands down the easiest carry tower in the game for new players attempting to reach the bonus round. Chance to adapt to armour types, meaning it does amplified damage to everything until the bonus round. It's range is amazing, and allows it to use a certain item set I'll discuss later. And lastly, the reason why it's so good, the cooldown on attack is 1s. Incredible DPS. Holgar the Horrible: Double hit + potion spawning = good recipe for a carry. Low range and potential for high miss chance if too many meads are consumed. Hitman: Innate crit chance and damage + long range = great DPS. However, tower damage is very random, making it an average carry tower unless you manage to get his damage, crit chance, crit damage and attack speed very high via potions or items. Scarface: Long range 100% splash damage with chance to burst fire. The chance was recently changed, allowing this chance to burst fire to occur regularly. Sucks balls against air. Great DPS to mass rounds. Poisonous Frog: Scaling poison damage indicates good DPS. Due to low range, it needs a lot of damage to be worth it. On the Shattered Plains map, you're able to build this tower close to spawn with support towers surrounding it, making it viable. Bear Hunter: Deals splash damage via traps good DPS. Very bad range, also weak to air. Risky pick for a carry. If placing this tower, attempt to place it where there is limited pathing for traps - this means the Bear Hunter will stack more traps on the same spots, for more damage. Blofeld Laser Satellite: "Multishot" to 3 targets in range. Deals damage based on gold. Steals gold per hit. Requires stacking of Money Bins and abusing the interest system. With a lot of gold generated by Money Bins, this tower can easily carry you through hundreds of seconds in the bonus round - especially as bonus round creeps now drop gold, effectively allowing you to sustain this tower. Dandelion: Splash damage dictates need for DPS; good against all armour types. Low range renders it a risky carry tower. This is a good early game tower, but be wary of the slow initial attack speed. Baby Rabbit: Multishot dictates potential DPS. An average carry tower; best used early game. Balu the Bear: Damage amp per 15 sec at cost of surrounding tower damage. Low range. Risky pick in general. However, the splash does apply within 3 fields, so you could say this tower has average range. It's an interesting tower, but you've got to play around with placement to get it working efficiently. Electric Chair: "Multishot" to 3 targets, but requires levels. Low range, but jump chance allows you to snipe random creeps. Very risky late game carry tower, but good early game. Muli the Evil Twin: Requires Huli to attack. Forces specific gameplay. Don't like. I've seen strategies played with Huli and Muli wherein Muli is placed away from spawn, allowing him to deal tonnes of damage when he does attack, but I consider that to be a bad design to clearing the bonus round due to the scaling difficulty of the creeps. Scarecrow: Requires time to "charge", meaning it is difficult to level up. Bad range. To be honest I've never really experimented with the Scarecrow, so for all I know he's a secret waiting to be discovered? Carry Support Towers Knusperhexe: Best carry support tower. Get it to level 99 (either through Ganesha or Scientist) and stack luck items and attack speed. She can then instantly kill mass creeps that come in range, increasing the armour shred of her passive. Excellent tower if you intend to survive 500 rounds + a decent time in the bonus round with the new armour changes. Mr. Iron: Amazing carry support tower. Has the ability to consume items to keep the stats. First consume a whole bunch of attack speed items, as the construct time is reduced by attack speed. Next consume Keys of Wisdom and a few Paintings - the Keys will speed up the process of surrounding towers leveling up. Then eat all those support items, to give your carry tower huge buffs in damage. Lastly, before the bonus round, eat all the Long Bows, to ensure you can annihilate air rounds. The Dark Forge: Best DPS in the game and is a great pre-bonus round tower, but the reason you want it is the chance to produce items. You can transmute these items. One strat to get it to level 99 is to make Iron Man swallow a dark item, and have a dark item equipped to Ganesha. Elvis Imitator: Surprisingly high DPS. But the reason you'd want it is due to the AoE slow. Drawback is that creeps move faster when out of the slow range. Also, really low range. If you can position him properly so that creeps are slowed twice, you're doing it right. Huli the Monkey: Sexist tower 8D Requires female towers to get the crit chance up. Has a passive stack of damage, meaning it can do a lot of DPS. This is a carry support tower because Huli's are required for Muli to work. If you wanted to run Hulis and Muli, the female towers to help Huli out would definitely be Knux and a bunch of Herb Witches. Wolf: Requires a "pack" of wolves. Has the potential to be very cool, but very low range. With the addition of the Wolfskin Cloak item, a new strategy has been opened up for a pack of Wolves, and I'm interested to see where the MazebertTD community takes it. Support Towers Ganesha: Best support tower in the game. Build it as soon as possible, as it levels up whenever a tower nearby levels up. When this tower is level 99, replace it with another tower. Does no damage. Manitou: Second best support tower. Gives surrounding towers multicrit (the ability to crit multiple times in a row). Does no damage. Whilst this tower is great for any hard-hitting carry tower, it is especially imperative for Hitman and Scarface - I feel that Manitou needs to be buffed a bit, despite how good it already is, just because :P Irish Pub: Gives nearby towers increased damage. The active gives all towers on the map increased damage for 18 seconds. Very potent. The active doesn't stack, so you can't activate three different Pubs at different times, for example, they all activate at once. Herb Witch: Increases attack speed of nearby towers, with scale per level. Increased experience gain. A good tower to build early and get some levels on for bonus attack speed. Great support tower. Beaver: 1/5 chance to stun a target. Low DPS. Average range. Good early game support tower when equipped with attack speed. Black Widow: Good early game for increased item chance, but I do not recommend trying to run her as a main or into the bonus round. Gib, the Frozen Daemon: Hard to obtain, as it can only be summoned by completing an item set. Has a good slow, but increases the armour of the creep at the same time. It is worth building if you can get it leveled up. Money Bin: Sole purpose of feeding the Laser Satellite. Gives you a higher interest rate, and increases the bounty gain of nearby towers. These towers stack, so the more you build, the higher the interest rate etc. Scientist: Terrible carry tower, but decent early game support tower. As it gains experience per level, simply replace it when it's at a higher level. You could theoretically place a Scientist on every tile early game to get the levels going for more important towers. Pocket Thief: An okay early game gameplay support tower. Good if you need the extra gold. It's absolutely useless leveled up, though, so don't bother trying to level it up; it's one of those towers that doesn't need levels. ||| Tower Placement ||| Okay, so now that we understand the definitions of "carry" and "support", and which towers fall into which categories, it's time to go over tower placement. By now you've probably guessed that tower placement is a key component to winning the game. Support towers can only support carry towers if they're placed properly, and carry towers can only carry if they are placed to maximise the kill of creeps. I will make a new section dedicated to Shattered Plains in the near future, but for now, this section talks about the main map, and is heavily influenced by the Impatience set. @Nillo made a great article about this in January, but I believe some things have changed since then, mainly the introduction of set items (but we'll get to that later). As Nillo did, let's start with the map.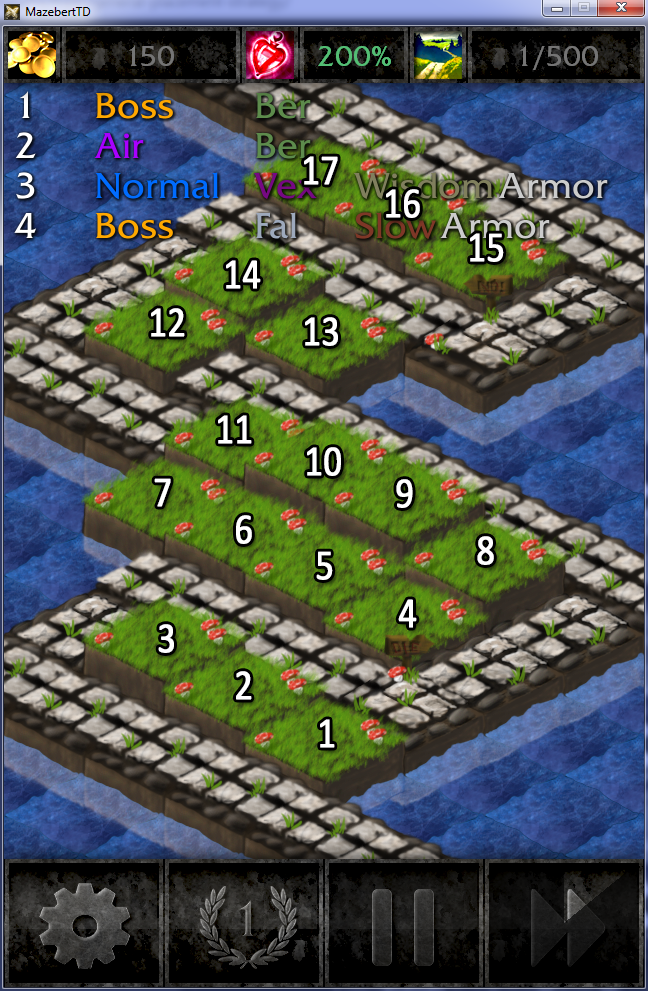 1 - 3: Towers that have a range of 4 and above can hit the spawn point from here. This is crucial if you wish to make use of the Impatience item set.
1: If using the Impatience set, the best tower to place here is Knux. It allows her to gain armour shred rapidly by destroying mass waves. Build a Scientist here to get the experience going, and eventually replace with Elephant, before replacing with Knux at level 99.
2: Where I'd place my main, personally. Whether that is the Shadow, Holgar, Hitman or Scarface. You need to use a main with a large range to make use of the Impatience set, though. You could probably try running a Jilly. You can start with any tower here; it's a great spot to build.
3: Mr. Iron. As said earlier, make him eat all your attack speed items, Keys of Wisdom + Paintings, followed by support items, and then Long Bows. Before you get Mr. Iron, a Beaver or Herb Witch is good for this spot to buff your main. If you don't have access to Beaver or Herb Witch early, Dandelion is a respectable early game pick for the splash.
4 - 7: Support towers.
4, 5 and 6: These spots can reach spot 2 with auras, so are the best places to build a Herb Witch and/or Irish Pub.
4: A good spot for Elvis or Gibb if you're running them. Or Black Widow early game (will be useless in the bonus round though).
7: In my personal opinion, probably the best place for the Bear Hunter. It can only reach two tiles from here, meaning it'll stack traps on those two tiles, meaning more damage. A decent fail safe to catch leaks.
8 - 11: Jilly's. Equipped with Impatience sets, these Jilly's will ensure that anything that gets past your main will either be Death By Toiler Paper'd, or stunned so your main has a chance to catch up.
9 or 10: A good spot for Manitou, and/or Hitman if you're running him as a second carry.
8: A decent spot for Scarface if you need the mass damage.
12 - 14: Jilly's. As above.
15 - 17: If you're running things like Laser Satellite, Money Bins are out of the way here. Also, good spots for the Dark Forge. If you feel the need for building something to catch leaks, you could build Scarecrows/Bear Hunters up here.
||| Item Equipping |||
So you're aware that all of the above is due to one item set in particular, the Impatience item set. However, there are some other items I'd like to discuss, and who should equip them. If I don't mention an item below, it means I transmute it immediately upon receiving it.
Common (White Gem) Items
Generally speaking, these items are only good early game. Equip Leather Boots to towers that benefit from attack speed (carry towers, Beavers, Jillys). School Books are good on Scientists and your main carry. Wet Towels are only good on Hitman to ensure his early game is better. The only other good common item is Well Done T-Bone Steak, which should go on your carry.
Uncommon (Blue Gem) Items
Better items. The Steak keep for your main. Ring of Greed is acceptable early game to generate more items, but is trash tier as soon as you drink a Waters of Life. Mr. Iron makes use of quite a few of these blue items: Longbows, Magic Mushrooms and at least one Painting of Solea. Monster Teeth is acceptable for Hitman. Keep Lucky Pants for towers like Knux and Jillys.
Rare (Yellow Gem) Items
Hello support items! Feed Fistful of Steel, Seven-League Boots, Herb Witch's Cauldron, Keys of Wisdom and Irish Pub's Barrel to Mr. Iron. The Rare T-Bone Steak is acceptable on your carry. The Viking Helmet is a decent carry item; also allows the wearer to drink mead potions with requires Holgar.
Unique (Purple Gem) Items
Only one of each of these items drops per game. Utilise Wedding Rings if you have two carry towers, but remove them during the bonus round (towers keep the oils from when the ring is equipped). Excalibur is great on Hitman. Helm of Hades should be placed on your main so it can reach the spawn point. Dungeon Door should be equipped to a high level tower that isn't a support carry or main carry. Scepter of Time should be equipped during the bonus round (and even before it, if you are confident).
Set Items (All Gems) Items
Frozen Set: Don't like any of the items and especially couldn't care less about Gibb. Frozen Book is useful for leveling up Mr. Iron or the Dark Forge. You could equip two Frozen items to a tower for the slow.
Withered Set: Amazing on a Jilly close to the spawn, or on Mr. Iron for the amp'd damage. Pre-bonus round/pre-Impatience Set, the Mummy Bandages are great on Knux.
Impatience's Wrath Set: Best set in the game. Equip this to your Knux and your main carry, most importantly. Then equip additional sets to all Jillys. Of course to ensure this set is as strong as possible, you need to be actively playing the game and pressing the NEXT button as soon as possible. It's a little tedious, but necessary if you want to get to the bonus round without using exploits.
// I'll write more later :) But I hope this has helped!
- jhoi [Edited: 26/07/14]
1 - 3: Towers that have a range of 4 and above can hit the spawn point from here. This is crucial if you wish to make use of the Impatience item set.
1: If using the Impatience set, the best tower to place here is Knux. It allows her to gain armour shred rapidly by destroying mass waves. Build a Scientist here to get the experience going, and eventually replace with Elephant, before replacing with Knux at level 99.
2: Where I'd place my main, personally. Whether that is the Shadow, Holgar, Hitman or Scarface. You need to use a main with a large range to make use of the Impatience set, though. You could probably try running a Jilly. You can start with any tower here; it's a great spot to build.
3: Mr. Iron. As said earlier, make him eat all your attack speed items, Keys of Wisdom + Paintings, followed by support items, and then Long Bows. Before you get Mr. Iron, a Beaver or Herb Witch is good for this spot to buff your main. If you don't have access to Beaver or Herb Witch early, Dandelion is a respectable early game pick for the splash.
4 - 7: Support towers.
4, 5 and 6: These spots can reach spot 2 with auras, so are the best places to build a Herb Witch and/or Irish Pub.
4: A good spot for Elvis or Gibb if you're running them. Or Black Widow early game (will be useless in the bonus round though).
7: In my personal opinion, probably the best place for the Bear Hunter. It can only reach two tiles from here, meaning it'll stack traps on those two tiles, meaning more damage. A decent fail safe to catch leaks.
8 - 11: Jilly's. Equipped with Impatience sets, these Jilly's will ensure that anything that gets past your main will either be Death By Toiler Paper'd, or stunned so your main has a chance to catch up.
9 or 10: A good spot for Manitou, and/or Hitman if you're running him as a second carry.
8: A decent spot for Scarface if you need the mass damage.
12 - 14: Jilly's. As above.
15 - 17: If you're running things like Laser Satellite, Money Bins are out of the way here. Also, good spots for the Dark Forge. If you feel the need for building something to catch leaks, you could build Scarecrows/Bear Hunters up here.
||| Item Equipping |||
So you're aware that all of the above is due to one item set in particular, the Impatience item set. However, there are some other items I'd like to discuss, and who should equip them. If I don't mention an item below, it means I transmute it immediately upon receiving it.
Common (White Gem) Items
Generally speaking, these items are only good early game. Equip Leather Boots to towers that benefit from attack speed (carry towers, Beavers, Jillys). School Books are good on Scientists and your main carry. Wet Towels are only good on Hitman to ensure his early game is better. The only other good common item is Well Done T-Bone Steak, which should go on your carry.
Uncommon (Blue Gem) Items
Better items. The Steak keep for your main. Ring of Greed is acceptable early game to generate more items, but is trash tier as soon as you drink a Waters of Life. Mr. Iron makes use of quite a few of these blue items: Longbows, Magic Mushrooms and at least one Painting of Solea. Monster Teeth is acceptable for Hitman. Keep Lucky Pants for towers like Knux and Jillys.
Rare (Yellow Gem) Items
Hello support items! Feed Fistful of Steel, Seven-League Boots, Herb Witch's Cauldron, Keys of Wisdom and Irish Pub's Barrel to Mr. Iron. The Rare T-Bone Steak is acceptable on your carry. The Viking Helmet is a decent carry item; also allows the wearer to drink mead potions with requires Holgar.
Unique (Purple Gem) Items
Only one of each of these items drops per game. Utilise Wedding Rings if you have two carry towers, but remove them during the bonus round (towers keep the oils from when the ring is equipped). Excalibur is great on Hitman. Helm of Hades should be placed on your main so it can reach the spawn point. Dungeon Door should be equipped to a high level tower that isn't a support carry or main carry. Scepter of Time should be equipped during the bonus round (and even before it, if you are confident).
Set Items (All Gems) Items
Frozen Set: Don't like any of the items and especially couldn't care less about Gibb. Frozen Book is useful for leveling up Mr. Iron or the Dark Forge. You could equip two Frozen items to a tower for the slow.
Withered Set: Amazing on a Jilly close to the spawn, or on Mr. Iron for the amp'd damage. Pre-bonus round/pre-Impatience Set, the Mummy Bandages are great on Knux.
Impatience's Wrath Set: Best set in the game. Equip this to your Knux and your main carry, most importantly. Then equip additional sets to all Jillys. Of course to ensure this set is as strong as possible, you need to be actively playing the game and pressing the NEXT button as soon as possible. It's a little tedious, but necessary if you want to get to the bonus round without using exploits.
// I'll write more later :) But I hope this has helped!
- jhoi [Edited: 26/07/14]


